Table of Contents
How to Take a Screenshot on Dell: The Introduction
Wondering how to take a screenshot on Dell? The process is simple and versatile across various models and operating systems. This guide will cover everything from basic methods using your keyboard to more advanced techniques with third-party software. Whether you’re a professional capturing important data for presentations or a student saving notes for study, knowing how to efficiently capture your screen on a Dell laptop or desktop can enhance your productivity and ensure you always have the information you need at your fingertips.

Different Methods for Taking Screenshots on a Dell Laptop or Desktop
Using the Print Screen Key
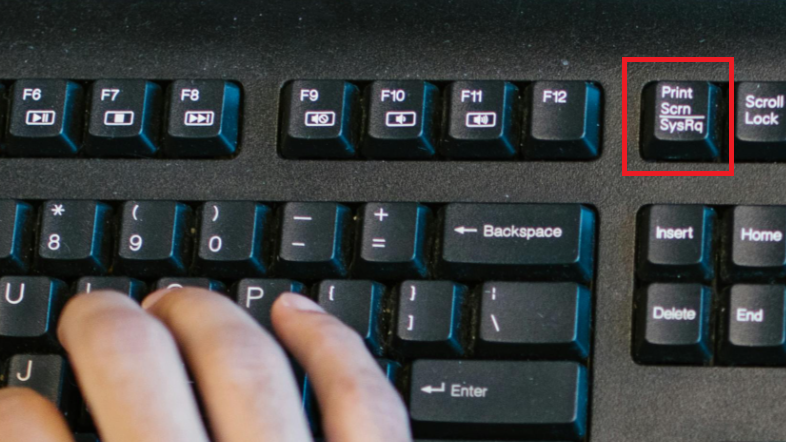
The most straightforward method to take a screenshot on Dell is by using the Print Screen key. This key might be labeled as ‘PrtScn’ or ‘PrtSc’ and is typically found in the upper right section of the keyboard. Here’s how to use it effectively:
Step-by-Step Guide to Using Print Screen
- Make sure your screen displays exactly what you want to capture.
- Press the ‘PrtScn’ key. This action copies the entire screen to the clipboard.
- Open an image editing tool like Paint or an advanced editor like Adobe Photoshop.
- Press ‘Ctrl + V’ to paste the screenshot. You can now edit, annotate, and save the file.
Snipping Tool: A Built-In Windows Feature
The Snipping Tool is a built-in application in Windows that offers more flexibility than the traditional Print Screen approach. It’s particularly useful for capturing a specific portion of your screen.
How to Use the Snipping Tool
- Search for “Snipping Tool” in the Windows search bar and open the app.
- Select the type of snip you want: free-form, rectangular, window, or full-screen.
- Click ‘New’, then use your mouse to draw the area you want to capture.
- The captured image will open in the Snipping Tool window, where you can add notes, save, or copy the screenshot.
Shortcuts for Windows 10 and Windows 11
For those using newer versions of Windows, there are additional shortcuts that make screenshotting even easier:
Quick Screenshot Shortcuts
- Windows + PrtScn: This combination will capture your entire screen and automatically save the screenshot in the ‘Screenshots’ folder inside your ‘Pictures’ library.
- Windows + Shift + S: Activates the Snip & Sketch tool, a more flexible version of the Snipping Tool, which allows you to select and capture a specific area of your screen and share it immediately.
Advanced Techniques for Professional Use
Using Third-Party Applications
While Windows built-in tools are sufficient for basic needs, professional environments might require more functionality. Applications like Snagit or Lightshot provide features such as video capture, scrolling screenshots, and powerful image editing tools.
Dual Monitor Setups
If you’re using a dual-monitor setup, capturing a screenshot might require a bit more finesse, especially if you only need content from one screen:
- For a full screenshot of all displays, use ‘Windows + PrtScn’.
- To capture a single display, activate the window on the monitor you want to capture and use ‘Alt + PrtScn’.
Tips for Effective Screenshot Management
Organizing Your Screenshots
Maintaining an organized library of screenshots can save you time when retrieving important images. Consider renaming your screenshots with descriptive titles and storing them in specific folders based on the project or subject matter.
Editing and Sharing Screenshots
Once you’ve captured a screenshot on your Dell, you might need to edit or share it. Use tools like Paint 3D for quick edits or more advanced programs like GIMP for extensive modifications. Sharing can be done directly through email, social media, or file-sharing services like Dropbox or Google Drive.
Discover How to Screen Record on iPhone Like a Pro
How to Take a Screenshot on Dell: The Conclusion
Whether for capturing perfect moments, saving important information, or sharing content with others, knowing how to take a screenshot on Dell is an essential skill in today’s digital age. With the methods outlined in this guide, you can choose the best approach for your needs and start screenshotting efficiently. Make sure to experiment with both built-in and third-party tools to find what works best for you.
Frequently Asked Questions
How do I take a screenshot on a Dell without the Print Screen button?
If your keyboard lacks a Print Screen button, you can use the Windows Snip & Sketch tool by pressing ‘Windows + Shift + S’. This provides a quick and easy way to capture and edit screenshots.
Can I take a screenshot on a Dell and directly save it without editing?
Yes, pressing ‘Windows + PrtScn’ on your keyboard will capture your entire screen and automatically save the screenshot in the ‘Screenshots’ folder of your ‘Pictures’ library, requiring no further action.
What is the best way to take a screenshot of a specific window on my Dell?
To capture just one window, make sure the window is active by clicking on it, then press ‘Alt + PrtScn’. This will capture your active window and copy it to the clipboard for you to paste into any program.
Are there any tools to take scrolling screenshots on a Dell?
For scrolling screenshots, third-party tools like Snagit are highly recommended. They allow you to capture entire web pages or documents seamlessly in one continuous image.
How can I quickly share a screenshot from my Dell?
Using the Snip & Sketch tool (accessed with ‘Windows + Shift + S’), you can quickly capture and share screenshots. After taking a screenshot, click the notification that appears to open the tool, where you can edit and share the image directly.
